You want to start your blog but you do not know how to write a post in WordPress classic editor? For the beginners, WordPress may seem a bit overwhelming, but it is very simple and obvious. All you need to do is get to know its features, hidden elements, and adding new posts and pages will be a pleasure.
The first steps are always difficult. All you need is a little patience and a positive attitude. You will see that what you just seemed to be incomprehensible now is very easy.
Are you ready for a dose of new information? Certainly yes :).
Maybe you don’t know how to start a WordPress blog read my step by step guide first. Or maybe you want to learn more about blogging, read the article: What is a blog.
If you are a beginner blogger and have just installed the latest version of WordPress today, your text editor is different from the one described below. With the new WordPress 5.0. the update appeared a new WordPress block editor called Gutenberg. You can read about its features, advantages, and possibilities in the article: The new WordPress block editor (Gutenberg).
The following post applies to the classic WordPress editor.
10 Steps How to write your first blog post.
1. Login to WordPress
2. Open the Add New Post window
3. Get more formatting options
4. Write your post
5. Change permalink
6. Adding images, links, pdf files and videos in your post
7. Select categories and tags
8. Adding post format
9. Adding featured image
10. Save, schedule or publish your post
Step 1. Login to WordPress
REMEMBER
You can log in to your blog by going to
www.yourdomainname.com/wp-admin
and using the credentials you set up with SiteGround or any other hosting company you used.

Step 2. How to write a post – Open the Add New Post window
To add a new post you can do it in the three ways below:
- Dashboard > Write your first blog post or
- Dashboard > +New > Post or
- Posts > Add New

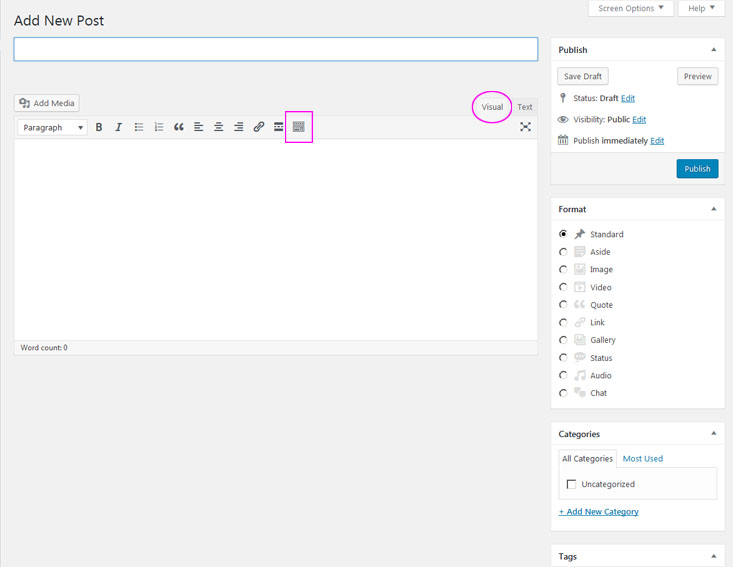
On the next screen, you’ll see the user-friendly editor.
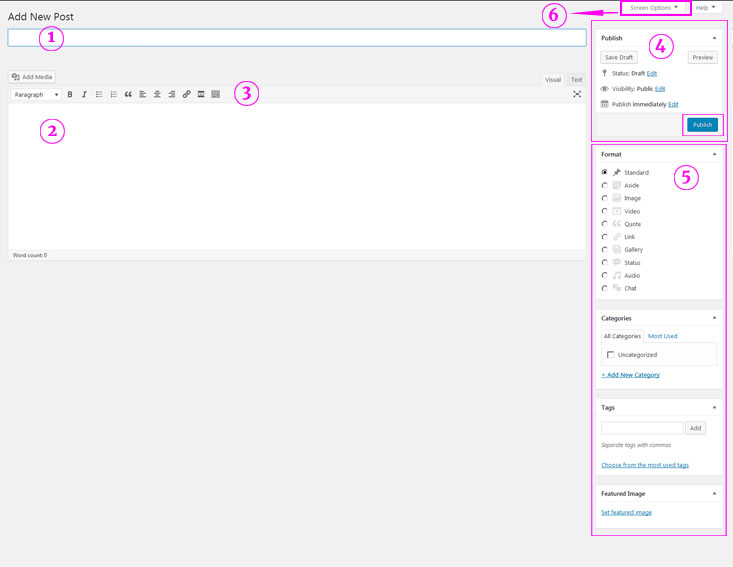
WordPress Text Editor
I will stop here so that you have a chance to learn more about all the elements and their functions.
1) Title Area: polish titles
2) Body Copy Box – Content Area: this is the place where you put your content.
3) Standard Editing Tools: here you have access to options such as bold, italic, lists, headings, etc.
4) Publish Box: This is one of the most important areas.
‘Preview’ button allows you to view the post before officially publishing it.
Here you can save a draft version or publish something by clicking on the ‘Publish’ button. You can make your post private or password-protected so that only your friends could see it. You can also schedule your post to be published later.
WordPress is a device used all around the world, that’s why if you want your post published at a certain time, make sure you have set up the right time zone. You can check it by entering Settings > General.
5) Additional Options: Here you can find post’s formats, categories, tags, and Featured image. We will look at these functions below.
6) Screen Options: allows you to customize the WordPress screen to your individual needs. You can hide or add individual boxes, set a different WordPress panel layout, etc.
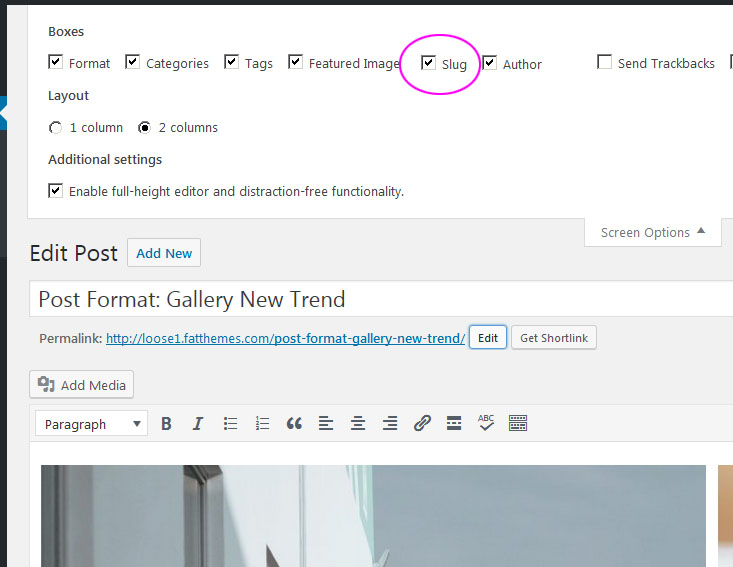
Screen Options Panel
Important elements are hidden here that may be useful when writing posts are:
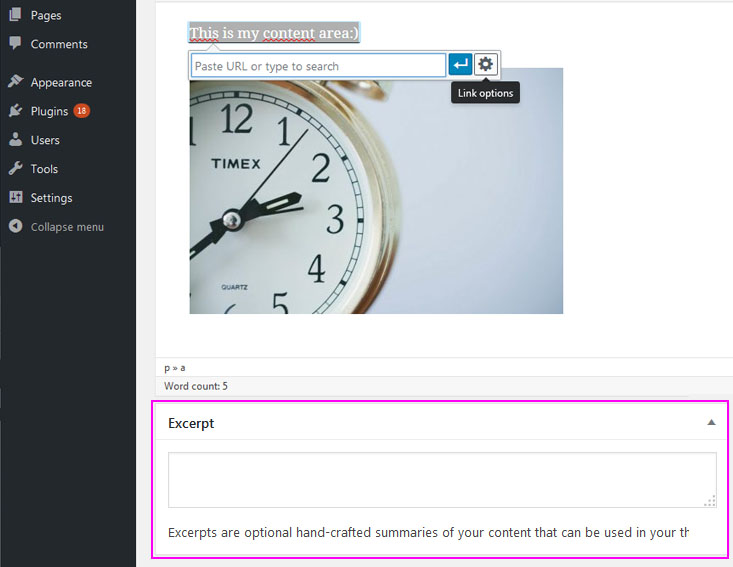
Excerpt
A summary or brief teaser of your post featured on the front page of your site.
When you check the Excerpt box, an excerpt field will appear at the bottom of the Body Copy Box (Content Area). Here you can enter the introduction to your article.
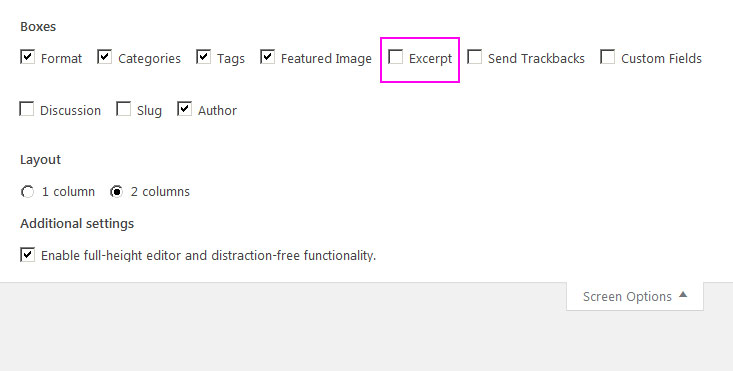
Not all templates support excerpts. It depends on the author.
You may also like
Remember, many authors want to develop their templates and it is important for them to customize the template for the user.
That’s why it is worth asking if there is a possibility of changing the template and adapting it to your needs.
REMEMBER:
Not all templates support excerpt it depends on the template’s author.
Discussion
Comments are a very important part of your site. Thanks to them, you can involve your readers.
But what if you do not want comments in your post?
Nothing easier! 🙂 WordPress gives you the option of turning them off or on in a specific post.
Just check the Discussion box and choose the appropriate option in the meta box that appears under the content area.
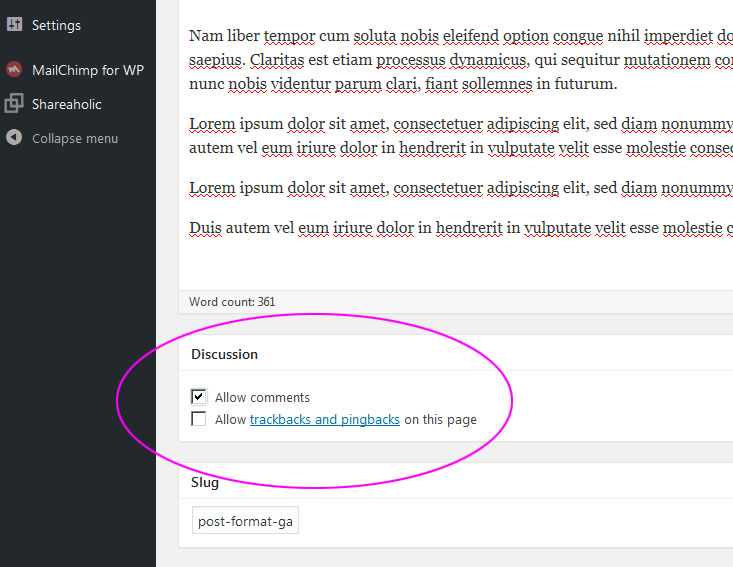
Slug
It is part of the post’s URL (part of the permalink).
The post slug is automatically generated by WordPress based on the title of the post. It displays under the post’s title.
How to change it I will discuss in step 5 below.
Author
If you are the only author on your blog, this option is not important to you, because you will always be the author 🙂
However, as a site owner, you can add other users and give them appropriate roles that define what a particular user can and can not do on your website.
In this situation, WordPress automatically enters the author of the post. You log in, write a post which means that you are the author.
If you want to change the author in your post, check the Author box. At the bottom of the page, a meta box will appear with more options.
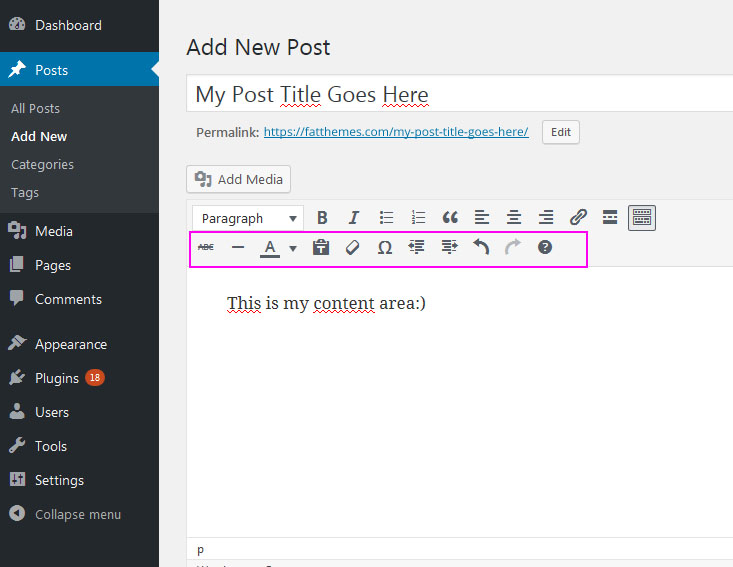
Step 3. Get more formatting options
Before you start, make sure you are in the Visual tab, which enables you to easily edit a text (Text tab is used to writing in HTML code).
On top of the Content area, you will find Standard Editing Tools, such as bold, italics, lists, headings, etc. At the very end, there is an icon called Toolbar Toggle. When you click on it, you will see options of text formatting, such as text color, underlining, etc. They will be useful during the editing process.
Step 4. Write your post
Now you can start writing your own post.
Add the text of your post in the text box and its title in the space above.
GOOD TO KNOW
Click the “Distraction-free writing mode” icon located at the top of the page, on the right side of the content area to disable all distracting accessories available on the site.
To return to the normal display mode, simply click it again.
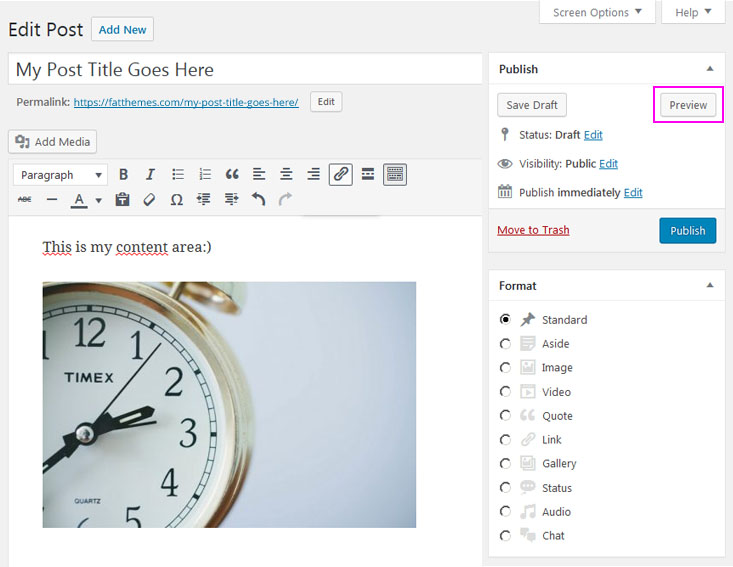
If you want to see how your post looks before publishing it, click the ‘Preview’ button in Publish Box.
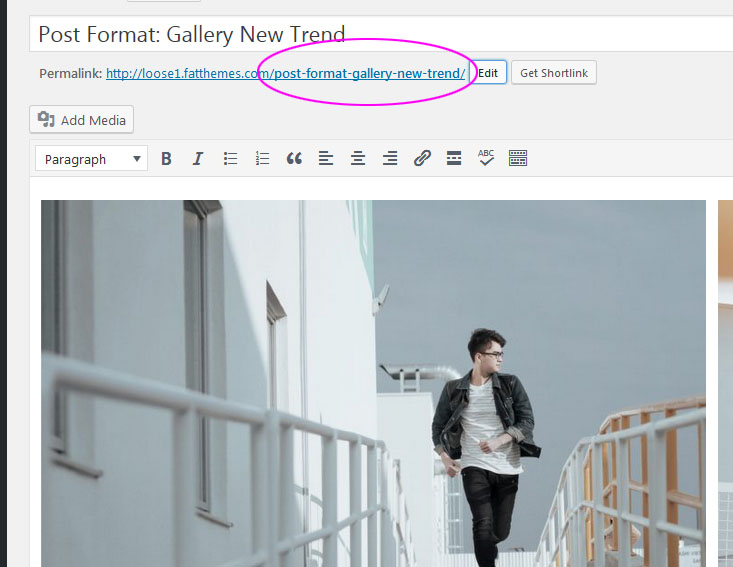
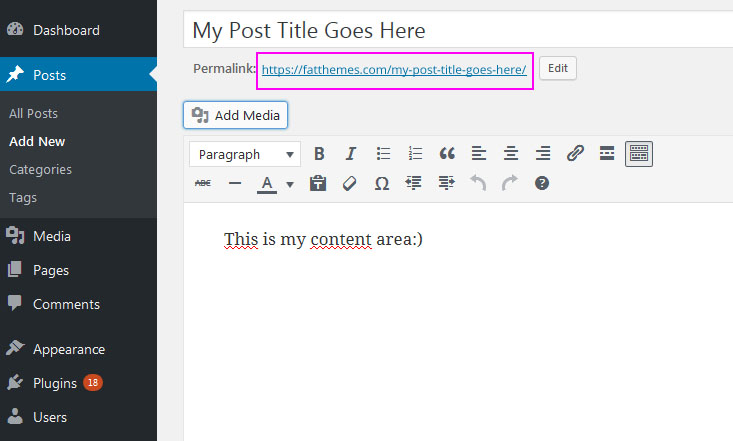
Step 5. Change permalink
After adding a title, a permalink will appear under it.
WordPress permalinks are one of the most important settings that you have to configure right after launching any WordPress website.
To avoid the hassle, do it before publishing the content.
Creating the appropriate structure of permalinks, remember the following features that permalink should meet:
– short, simple, easy to remember,
– refers to the content on the site,
– contains, if possible focus keyword.
Read more in the article: What are permalinks and what structure of permalinks to choose.
If you already have the appropriate permalink structure set up, before publishing your post you can edit your permalink.
You can do it in the two ways below:
1) by clicking the ‘Edit’ button next to the permalink
2) or checking the Slug box in the Screen Options and changing the post slug in the space that will appear under the Content Area.
GOOD TO KNOW
Everything that you publish on your website (a post or a page) has its own unique URL address (permalink), which makes it visible on the Internet. If you change an URL address of an already published post, the previous address, which you might have shared on social media or other sites, will not work.
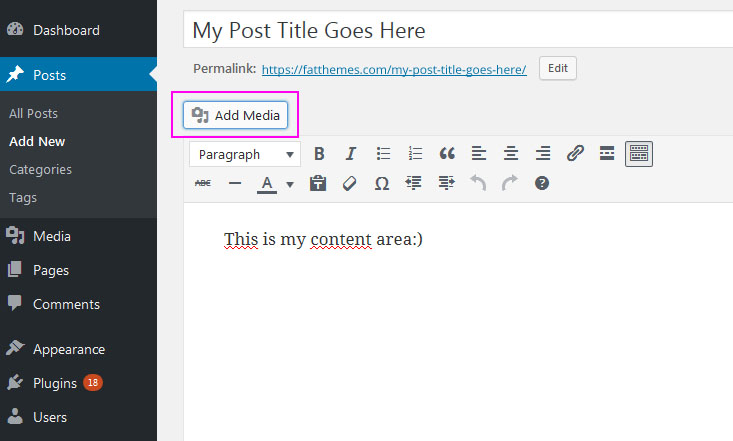
Step 6. Adding images, links, pdf files and videos in your post
6.1. Adding images
Before you add photos to your post make sure you read this article: How to optimize images and why?
Set your cursor over the content area, where you want your image to be visible, click on Add Media > Upload File then Drop files or click the ‘Select Files’ button.
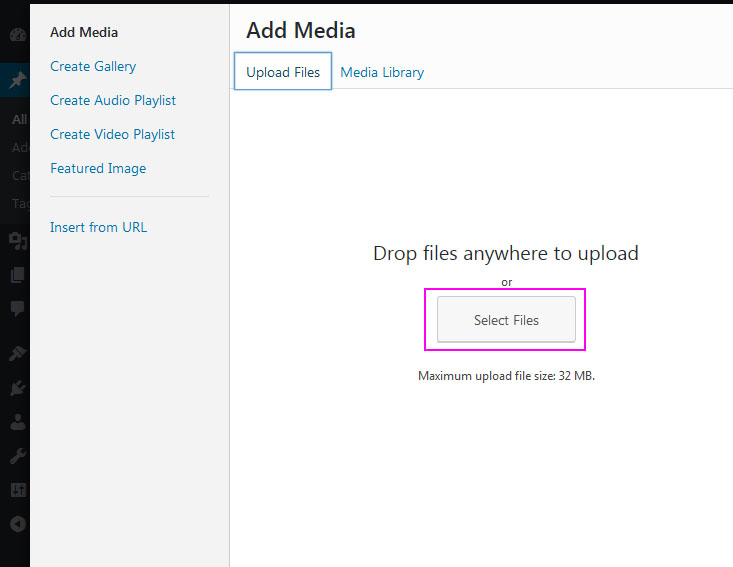
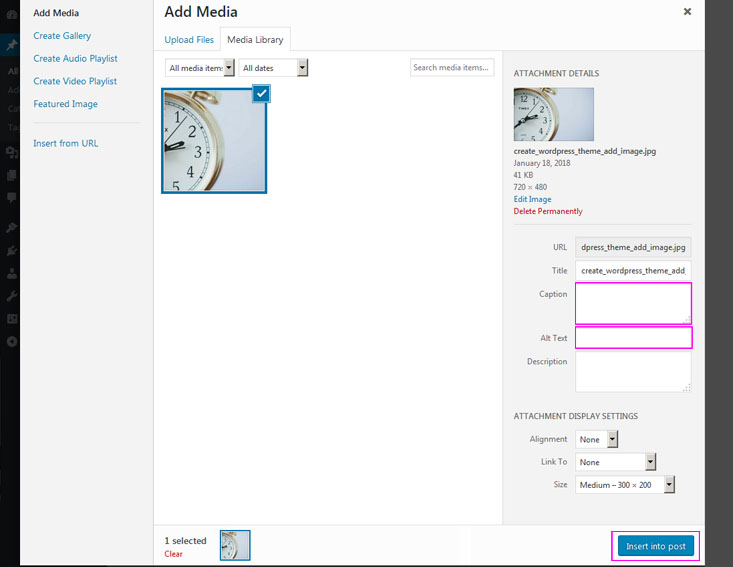
Choose the right image.
In order to do that, you just have to click on your image and make sure it has been marked, as you can see on the picture above (if you click on it for the second time, it will be unmarked).
Fill the Alt Text space as well as Caption. It’s crucial for SEO – (Search Engine Optimization).
In the end, click the ‘Insert into post’ button. And it’s done.
GOOD TO KNOW
Never add images directly from the camera. Before they are added on your website, they should be optimized, reduced and compressed.
The browsers see only the text – they don’t recognize images. Always remember to fill the Alt Text – ‘Alternate Text’ space.
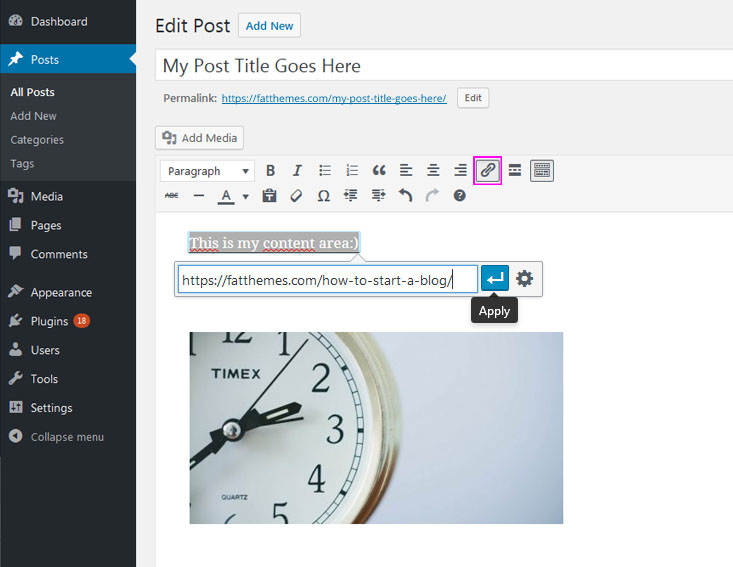
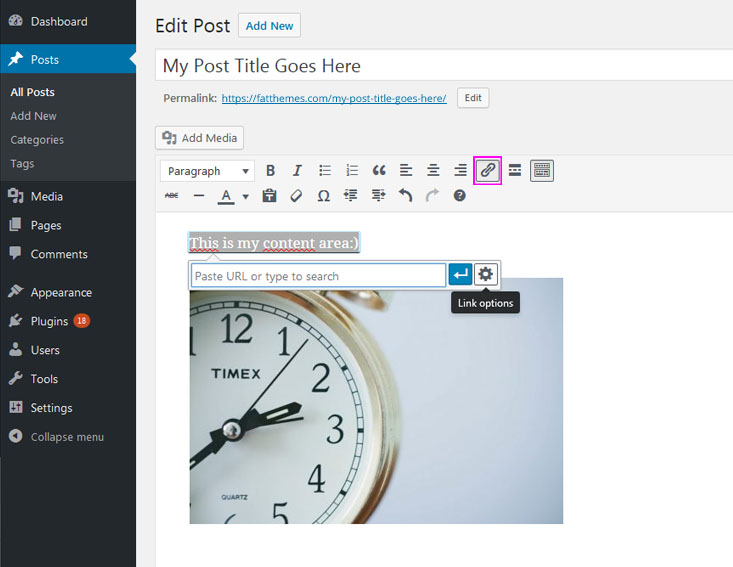
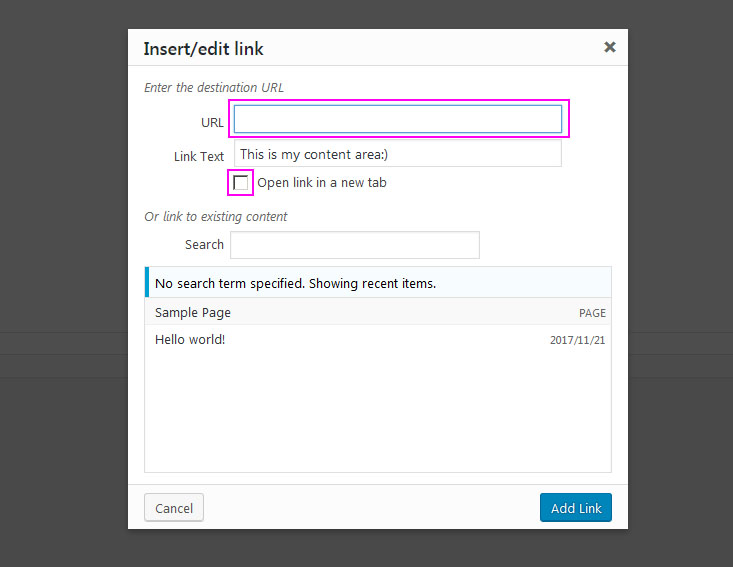
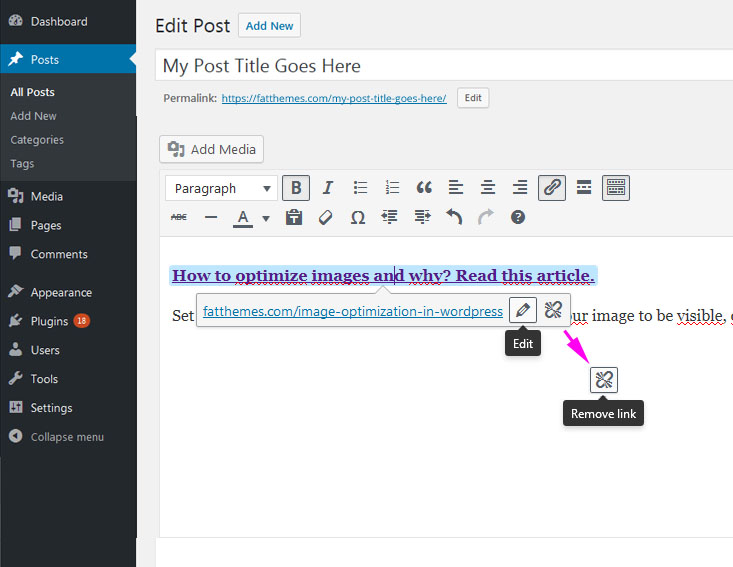
6.2. Adding links
Highlight the text you want to link, click on the icon ‘Insert/edit link’.
Space will appear, where you can insert your URL address and then click the ‘Apply’ icon or click on the icon ‘Link Options’ in order to see all the possible combinations. Fill the right spaces and click ‘Add Link’.
REMEMBER:
you can always change the settings of the link. Just click on the link you want to change and choose one of the available options ‘Edit’ or ‘Remove link’.
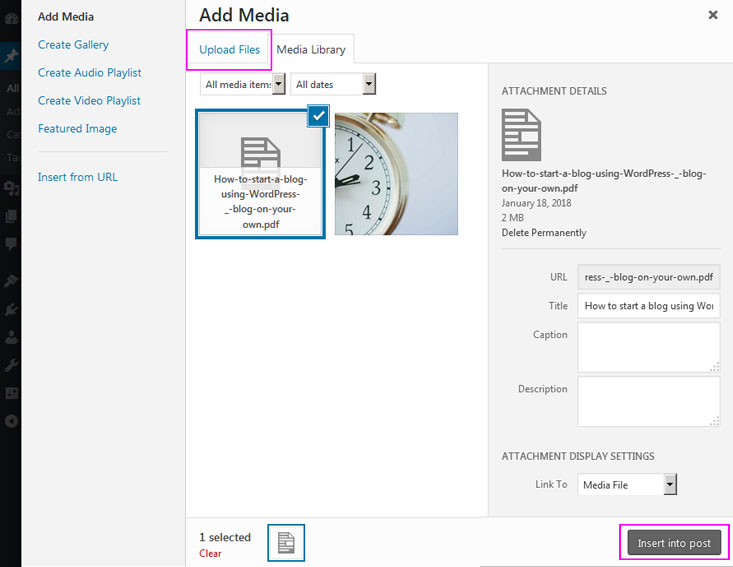
6.3. Adding pdf files
Set the cursor over the place where you want a pdf file to appear, and click on Add Media > Upload File. Then upload your pdf file. On the right side, you can change your post’s title – and it’s going to be the Post Title which will appear in the place where you set the cursor. Click ‘Insert into post’.

6.4. Adding a video
To add a video on your website first go to the individual page of this YouTube video. Click the ‘Share’ link on the right under the video, next click the ‘Embed’ button.
Choose the options which you find interesting and click ‘Copy’.
Follow the same steps, when you are sharing a video from sites such as Vimeo.
Now go back to your own site, go to the TEXT TAB and add this link in a place you find the most suitable.
Note that the link you have copied is an HTML code, so you need to add it in Text Tab, and not in Visual Tab.
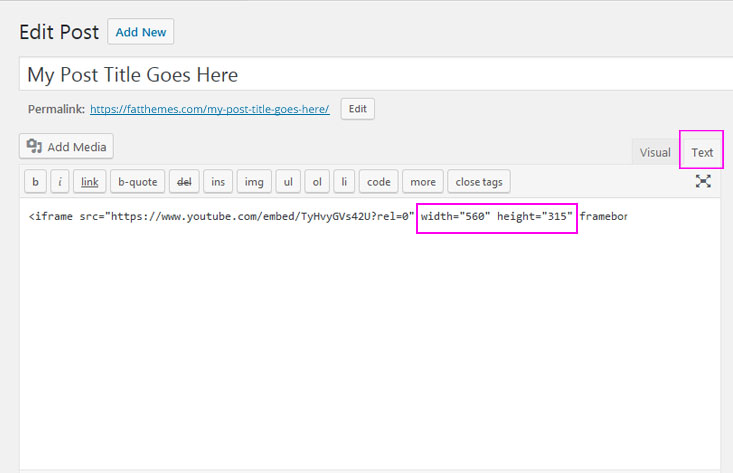
You can always change the size of the video.
You can do this by entering new dimensions in the Text Tab, but be careful do not disturb the proportion of the video.
Finally, don’t forget to save changes. Click the ‘Update’ button.
Step 7: Adding categories and tags
Tags and categories help in grouping your content. They make your content orderly, which helps your readers with finding articles they consider to be interesting.
Categories and tags are usually found in the column to the right of the WordPress panel.
To add a new category, click ‘+Add New Category’. To add a new tag, enter the tag in the empty Tags field and click the ‘Add’ button.
You can manage your categories and tags by going to Administration Panels > Posts > Categories or Tags.
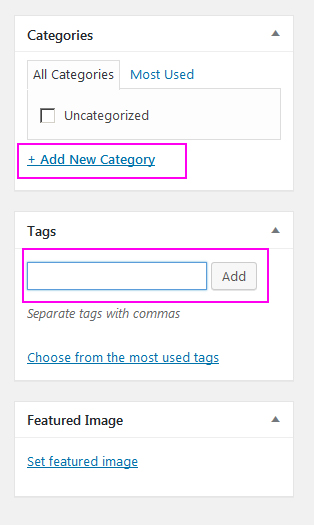
Besides, categories and tags help organize your content, so your users can find what they want more quickly.
The most important is that categories also improve the SEO of your site.
Thanks to categories SEO robots can better rank your content.
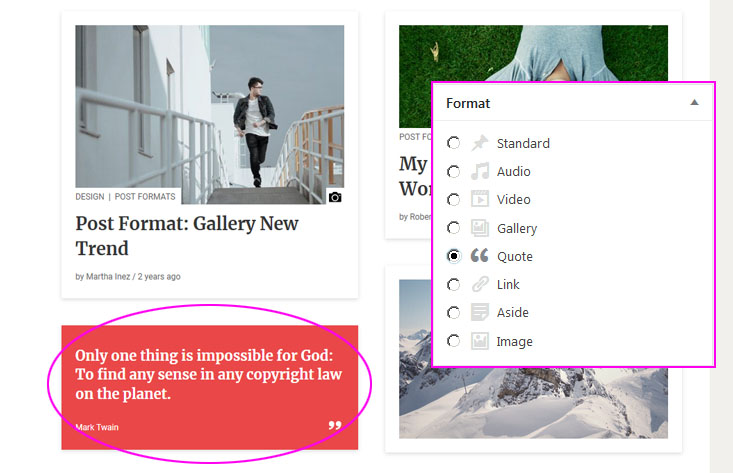
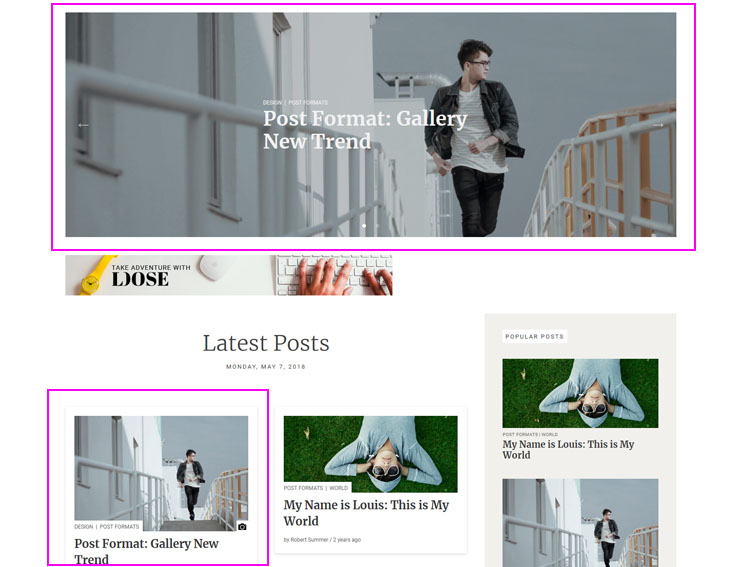
Step 8: Adding post format
WordPress Post Format is a different way to display specific posts.
In short, with a theme that supports Post Formats, you can change how each post looks by choosing a Post Format from a radio-button list.
Themes are not required to support every WordPress format it depends on the author of the theme.
If your theme supports Post Formats you can use them to highlight the post.
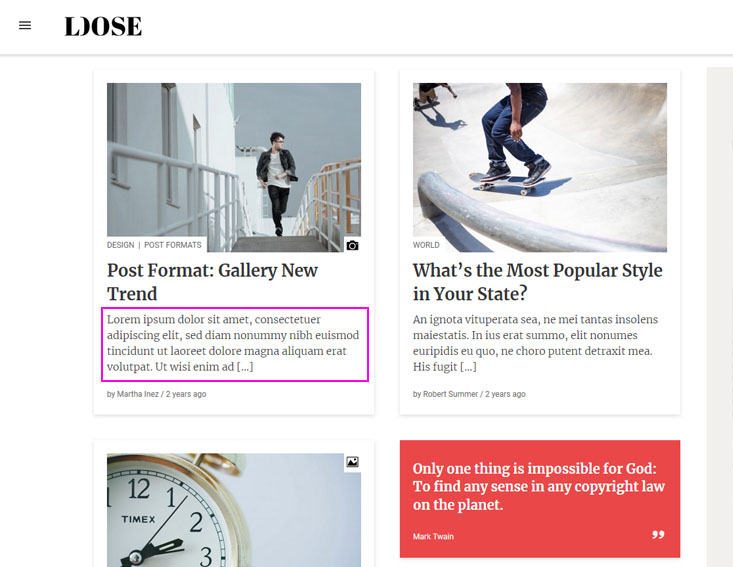
For example, your post will be just a quote. By checking the Post Format ‘Quote’ your post will display like this:
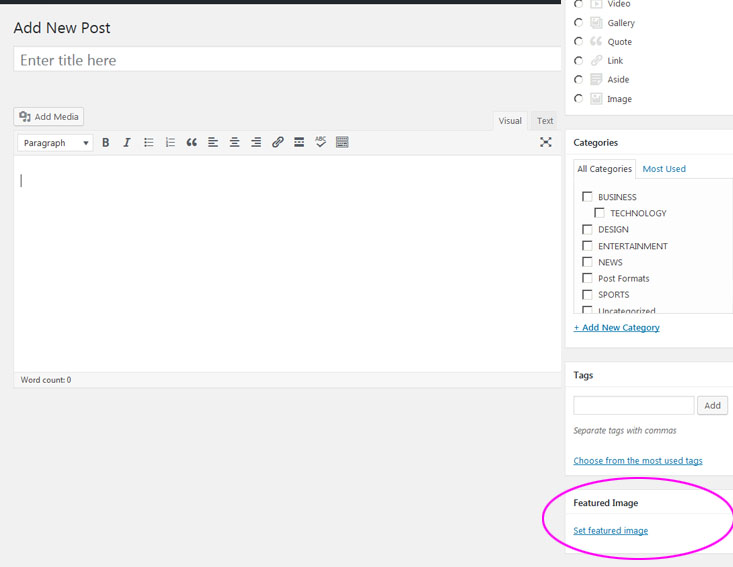
Step 9: Adding featured image
Featured Image (also known as post thumbnail) is an image that is chosen as the representative image for Posts, Pages or Custom Post Types. The display of this image is up to the theme but most WordPress themes support featured images.
To add the featured image just click the ‘Set up featured image’ link, which is usually located at the very bottom right and upload a new image from your computer.
Step 10: Save, schedule or publish your post
WordPress is very flexible and adapted to the users’ needs. You have many options to save a post or a page.
Options to save a post or a page
You can save a draft – if your post isn’t ready for publication yet, you can schedule it to be published on a specific date or simply publish and here you have three different ways to choose:
– public – your posts viewable by everyone,
– private – viewable only to you and to other editors or admins within your site,
– password protected only for logged users. Password protected means anyone who wants to see the post has to have the password you set.
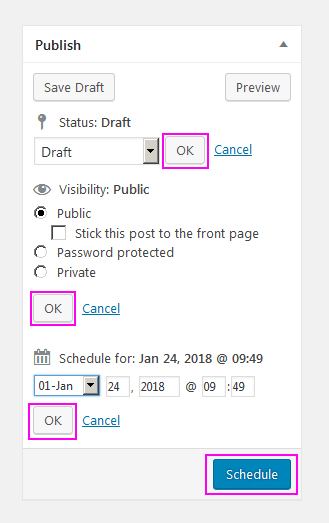
- To publish your post click the ‘Publish’ button, located on the right side of the Publish Box section.
- You can save the draft version of your post click the ‘Save Draft’ button, located on the right side of the Publish Box section.
- If you want to schedule a later publication of your post in the ‘Publish Box’ section, click on the link ‘Edit’, next to the ‘Publish immediately’ option, and select the right date. Then, click the ‘OK’ button and the ‘Schedule’ button for confirmation.
In the main Administration Screen, enter Settings > General, in order to make sure that you have set the right time zone. - to make your post private or password-secured click on the link ‘Edit’ next to ‘ Visibility’ and choose the right option, then click ‘OK’ and ‘Update’ button.
Stick this post to the front page option
There is also an option ‘Stick this post to the front page’ in the Publish section.
What does it mean?
WordPress gives you the opportunity to highlight individual posts on the page the so-called. sticky post.
If this option is checked, the post will be placed at the top of the front page of posts.
However, it should be remembered that how the highlighted posts will be displayed depends on the theme’s author. He decides how to make them stand out.
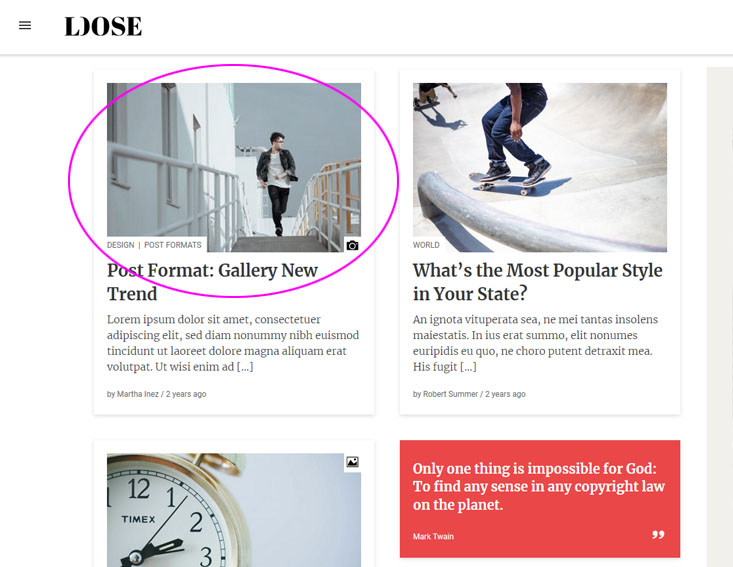
For example, in the Loose theme sticky posts are always displayed in the main slide on the page, but by selecting the appropriate option they will also appear at the top of the page.
Summary
That’s all:)
Now you know how to write a post on your blog. What’s more, you can publish it, save it in a draft, etc. You know all the tricks:)
My congratulations!!!
WordPress is very clear and intuitive, you only need a moment and you already know almost everything about it 🙂
So, don’t waste your time and start blogging now!!!
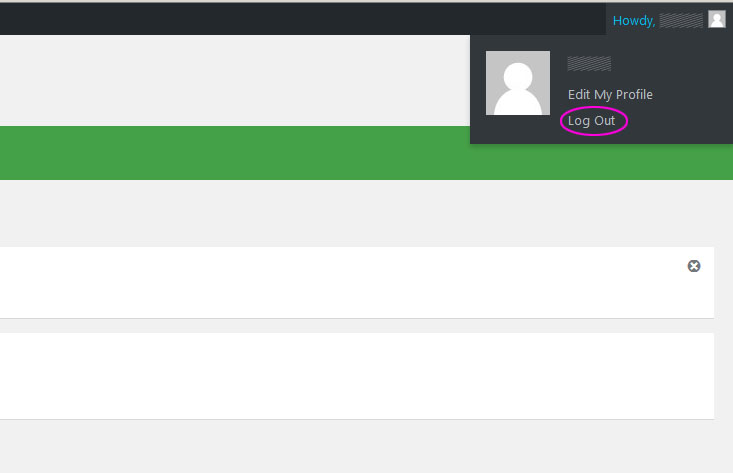
One more small tip:
To log out of the WordPress panel hover the mouse over the text ‘Howdy, your user name’ in the top right corner and click ‘Log Out’.